 Calendar App Tutorial
Calendar App Tutorial
Calendar App Tutorial
The PNCE Calendar Application is an application for entering and viewing events related to the department. At the time of this writing, it is currently used to display information about colloquia, seminars, and special events (e.g. conferences).
To use the calendar, just visit the URL http://www.physics.umd.edu/cgi-script/calendar/cal.pl. By default, you will see a basic calendar listing colloquia, seminars, and special events for the current week. It will also list some holidays and other notices (called DayNotes in this application).
The screen you see has three major areas, as shown below in green
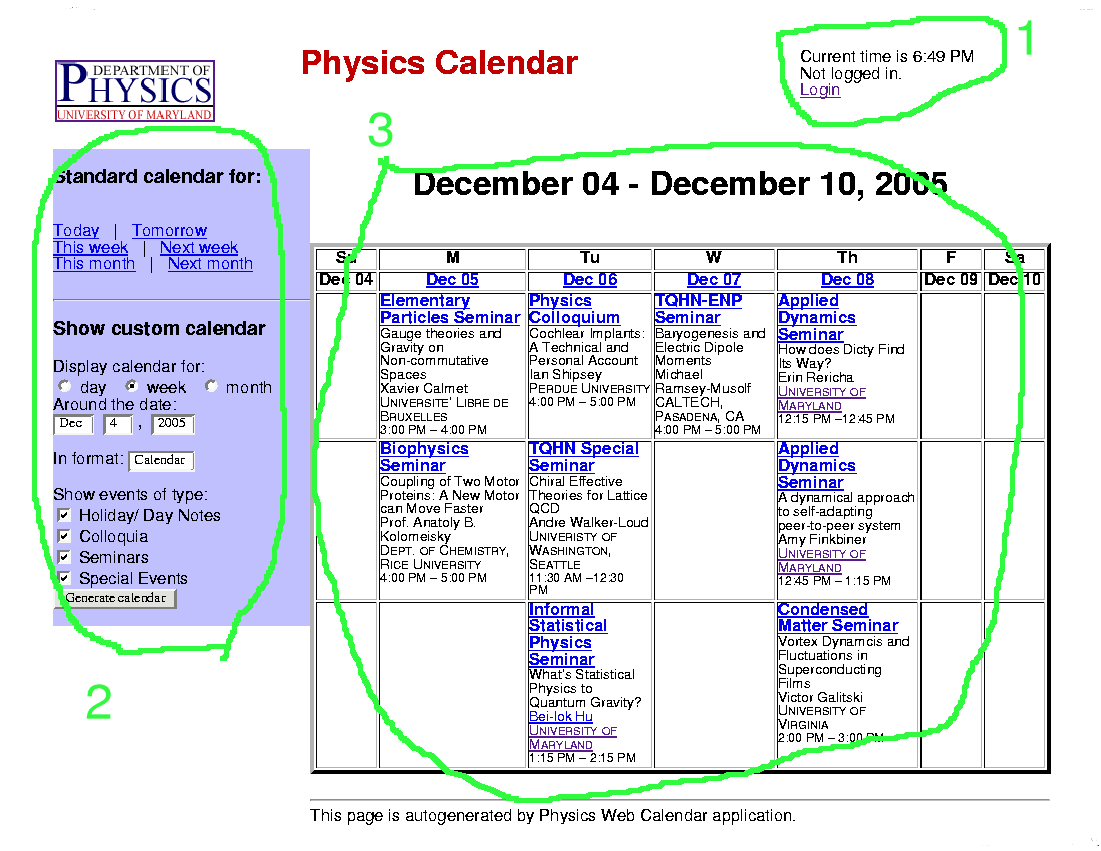
Most people, most of the time, will only be interested in viewing what is scheduled. For this, the part of the page that interests you most is the main display window (#3 in the sample image), as this is where the events are shown. You will also be interested in the light blue navigation sidebar on the left (#2 in the screenshot), as that is where you can select what days to view, and how to view them, etc. Unless you are going to enter or edit events, you can ignore the authentication information region (#1 in the screenshot), and even if you are entering stuff you can mostly ignore it.
Now to discuss each of these sections in a bit more detail.
Unless you need to enter or edit information in the calendar, or gain access to restricted information in the calendar, you might as well skip this section. And currently, there is no restricted information stored or planned to be stored in the calendar, so basically skip this unless you are going to enter or edit information, because otherwise there is no need to log into the application, and no need to bother with this part of the screen.
All restricted access to the application is controlled via the campus LDAP directory, and you will need a valid LDAP directory ID/username and password to log in. Even then, unless arrangements have been made with PCS through the chair's office to grant access rights to your LDAP account, you will be limitted in what you can do.
The authentication information region displays several lines of information:
NOTE: You do not have to log in if you just want to look at events in the calendar.
When you do log in, the computer sends a bit of encrypted information to your browser, and it is sent back everytime you look for a page. This encrypted information is called a token, and it tells the computer that you are you. In theory, however, someone might be able to wiretap your internet connection and get a copy of that token, and impersonate you to the computer. To make this more difficult, the tokens only have a short lifespan, which is what all the expiration stuff above was about.
NOTE: If you are about to enter a bunch of information for an event, check the expiry on your tokens first (and remember to check that the current time is what the page says it is). Although the application tries to be forgiving, if in the middle of adding an event your tokens expire, the information you typed in may get lost. Events that you entered and confirmed before the expiration will not be affected. If in doubt, renew your tokens.
The light blue section on the left is called the navigation sidebar. It is where you can control what is displayed in the main window. Also, each time a calendar is drawn, the initial values in the control panel form should reflect the current settings.
At the top, under the title Standard Calendar for there are six links you can click on to show you some of the more commonly requested displays. These allow you to see week and month views in a calendar for this week, this month, next week, or next month. You can also see a single day view in a list format. Although we are holding off discussing the terms 'view' and 'format' for now, you can just follow the links and pretty much get the concept more easily than it can be described.
Under the title Show Custom Calendar you can specify more precisely what to display. Once you specify what you want to see, you just have to click on the Generate calendar button and what you requested should be put into the main display screen. We will now briefly discuss the various options you can select from.
First, you get to select what view you want:
Next, you can choose the date around which to view. It will behave a bit oddly if you give it an invalid date, e.g. a month view around Feb 30 will actually show you the month of March, but thats what you get if you enter a bad date.
Your next choice is to select what format to have the data displayed in. Your choices are:
The restrictions on some formats to specific views is because some formats really just do not make sense for some views, or would be too complicated to display. If you select an invalid format for a specific view, the program will silently change your request to a valid format. E.g., if you request a calendar format with a day view, you will get a list format instead. Similarly, attempting a schedule format on a month view will return a calendar format.
Your final option is to choose which sets of events to display. By default, all are displayed. The choices are:
Finally, there are a few more options to tweak the display a bit. Since most people will not use them, they are hidden unless the Show advanced options check box is selected. Uncheck the box to hide it again. Most people can just skip this section.
If the 24hr clock box is checked, all times should be printed in a 24 hour clock fashion. E.g., 13:00 instead of 1pm. Uncheck the box to return to the AM/PM notation.
There are several additional options for the schedule format. You can set the start and end hour for the schedule, although note that this does not cause any events to get omitted. There is always a row at the beginning and the end for events starting before the start hour or ending after the end hour. However, all times before and after the selected hours get compressed into that one row. You can also select (via the Ticks every) box, how frequently the time label on the left gets printed. By default it is every half hour. By using the Rows per tick option, you can control the resolution of the graphing. The number selected indicates the number of rows/time blocks per tick interval. The time blocks used will not exceed an hour (except for the before start hour/after end hour rows) but can be made as fine as every 5 minutes by selecting 15 minutes for Ticks every and 3 for Rows per tick.
The schedule options will only appear if a schedule format is selected.
If you are an administrative user, you will see an additional check box entitled Use test templates/css. If selected, this will cause the application to look for templates and css style files in an alternative directory, allowing modifications to be tested without breaking things for normal users.
Once you selected what you want to see, just hit the Generate calendar button and it will appear.
In addition to the form elements discussed above, the navigation sidebar also contains links to this help file, and a link to create a new event if you are logged in.
While the navigation sidebar and authentication information region can be of assistance in using the application, the only reason to use this application is for what is in the main window (area 3 on the figure). Whenever you request information from the calendar application, this is where it will be shown.
First off, if there were any problems in processing your request, an error message will appear in the top of the main window. The application will try its best to display what you requested anyway, but it will sometimes provide an error message if it was confused. If you are seeing a lot of error messages here, something is probably wrong, and you should record the error message and contact PCS.
After any error messages (hopefully there were none), the information you requested should be displayed. The intention is that the information should be presented in a fashion similar to that of paper based calendars you are likely familiar with, with the addition of hopefully intuitive hyperlinks. You are encouraged to just try the calendar out a bit rather than reading this, as it is hoped that five or ten minutes of playing with it will give you a better sense of how it works than reading any explanations. But if you find an explanation is needed, this section will attempt to explain it.
Sometimes you may see an event with a line through it. That means the event was cancelled or rescheduled. We leave cancelled events in the calendar for a while to ensure that people can more easily discover about the cancellation or rescheduling. Clicking on the event may provide information about why it was cancelled or when it was rescheduled to.
We have mentioned views, formats and events in this document a number of times already, without getting into much detail. At this point, it seems necessary to get into a bit more detail:
For the purposes of this application, a view determines the time period for which information is displayed. The application deals with four levels of views:
The amount of information about an event that is shown increases as the view gets more specific, mainly to prevent information overload and problems with readability of the display. So the month view only gives minimal information about the event, whereas the event view pretty tells you all there is about the event.
Hyperlinks exist which hopefully make it quite simply to drill down to find the details about an event. In the month view, in the calendar format, to the left of each week is a link named this week only which drills down to a view of that specific week. By clicking on the date in month or week calendar formats, you get a listing of events for that day.
Similarly, in a week or month view, by clicking on the title of a colloquium or seminar (this is the title of the colloquia/seminar series, not of the individual talk), you are brought to the event view for that event. In event or day views, most if not all of the information for the event is already displayed, and clicking on the title of the colloquium or seminar will bring you to the web page for the colloquia/seminar series, if one exists. From a day listing, there is a link called Event details which will bring you to the event view.
If an event has a line through it, it has been cancelled or rescheduled. We leave cancelled events in the calendar for a while to ensure that people can more easily discover about the cancellation or rescheduling. Clicking on the event may provide information about why it was cancelled or when it was rescheduled to.
From the event view, there is also a link Download iCal version of this event. This can be used to import the event into a calendaring application on your PC or PDA, see here for more information regarding importing calendars into other applications.
Also, if you are logged in and have the authorization required, you may see a link Edit this event in the event view. As you may have guessed, you can click on that link to edit the event.
In addition to choosing which events to display, you can choose how you wish them to be displayed by selecting the format. Not all combinations of format and view make sense, or could be displayed in any reasonable fashion. If you request a combination which the program does not allow, it will change the format into something more reasonable.
The defined formats are:
In addition, there is a sort of special format for editting or entering events.
In general, the calendar and schedule formats display less information than the others due to space constraints. However, they present the information they due give in a form which may be more readily interpretted.
We use the term event to refer to any item which can be placed in this calendar application. However, several different subspecies of events are also distinguished:
The application design is meant to be very modular and to support the addition of new classes of events. Some ideas for such are being considered, but they will probably use a modified form of the application to avoid making this interface too complicated.
Although it is hoped that you will find this application useful and well designed, it makes no aspirations to be a personal calendaring system. Personal calendaring systems on desktop or laptop PCs, or even on handheld PDA's and other devices can be quite useful. The question is, how can you get information from this application into other calendaring applications?
We have tried to make this fairly simple, at least for calendaring applications that support the iCal (aka iCalendar) standard for exchanging calendar information ( see Wikipedia reference, or RFC #2445).
Note: The support for iCal in this application is somewhat experimental, and not very well tested. Since it is also expected that there will be variations in how different products implement the iCal standard, it is expected that your mileage may vary. PCS only uses a very limitted amount of calendaring software, so it is difficult to test very well. Please feel free to provide feedback to PCS about the success or lack thereof with this feature. Note, however, that while PCS would like to see this feature work, it is not a high priority to make it work.
The iCal standard is supported by a large number of products, including a number of Mozilla products, Apple's standard calendaring tool, a number of Linux calendaring applications, and Windows Calendar. It also has some support in Microsoft Outlook. Depending on the product you are using, you should be able to do one or more of:
This is the most basic function, and is the most likely to work. It is the only one which seems to work with Microsoft Outlook (although there may be an addon which will support subscriptions).
To import a single event into your calendar, find the event you wish to import and click on it to get into the event view. At the bottom, there should be a link named Download iCal version of this event. Click on this link, and if your browser and local calendaring program are appropriately configured, it should get loaded into your personal calendar.
This was tested and should work with recent versions of MS Outlook.
If you wish to import, lets say a weeks worth of events into your calendar in one step, you should go to the navigation sidebar, select the view and events you wish to display, and select the iCal format. When you click on the Generate calendar, the list of events selected should get loaded into your personal calendar, at least assuming your browser and calendaring program are appropriately configured.
Note that this will not work with Outlook. Outlook does not seem to like reading multiple events in a single iCal file, and will ignore all but the first event. Nor has this been tested on any other platform.
A neat feature of the iCal standard is the ability to subscribe to calendars. Basically, you point your calendaring application at an URL, and the calendaring application will periodically examine the iCal file at that URL, and if there are no entries, etc., update its local calendar with the changes. This means (if your calendar program supports it) instead of every day or week going to the departmental calendar and downloading the events for the week, you tell your application, once, where to look for the calendar events, and it checks for new stuff and downloads it automatically for you.
I have not been able to test that this works, and it does not work with Outlook (although supposedly an open-source add-on for Outlook 2003 called RemoteCalendars is supposed to add that functionality to Outlook).
The Physics Calendaring Program will, once a day (so please do not configure your calendaring application to check more frequently than that), create iCal files from the calendar for you to subscribe to. The subscription URLs are:


