The first thing to do is to get a micro SD card (these are cheap, like $5 for a 32G). The 3B+ is a 64bit machine so 32G seems like plenty, with no worries about needing more space later (famous last words). Take the microSD card and put it into a USB adapter and mount it on your PC or MAC (both work, you might have to format it if the OS makes you but that's fine). Then go to raspberry.com, click on the software tab and then download the installer (it's called "Raspberry Pi Imager v1.7.5 and is only around 20MBytes). If you want to do exactly what I did and can't find that particular installer on the web site, you can find them here:
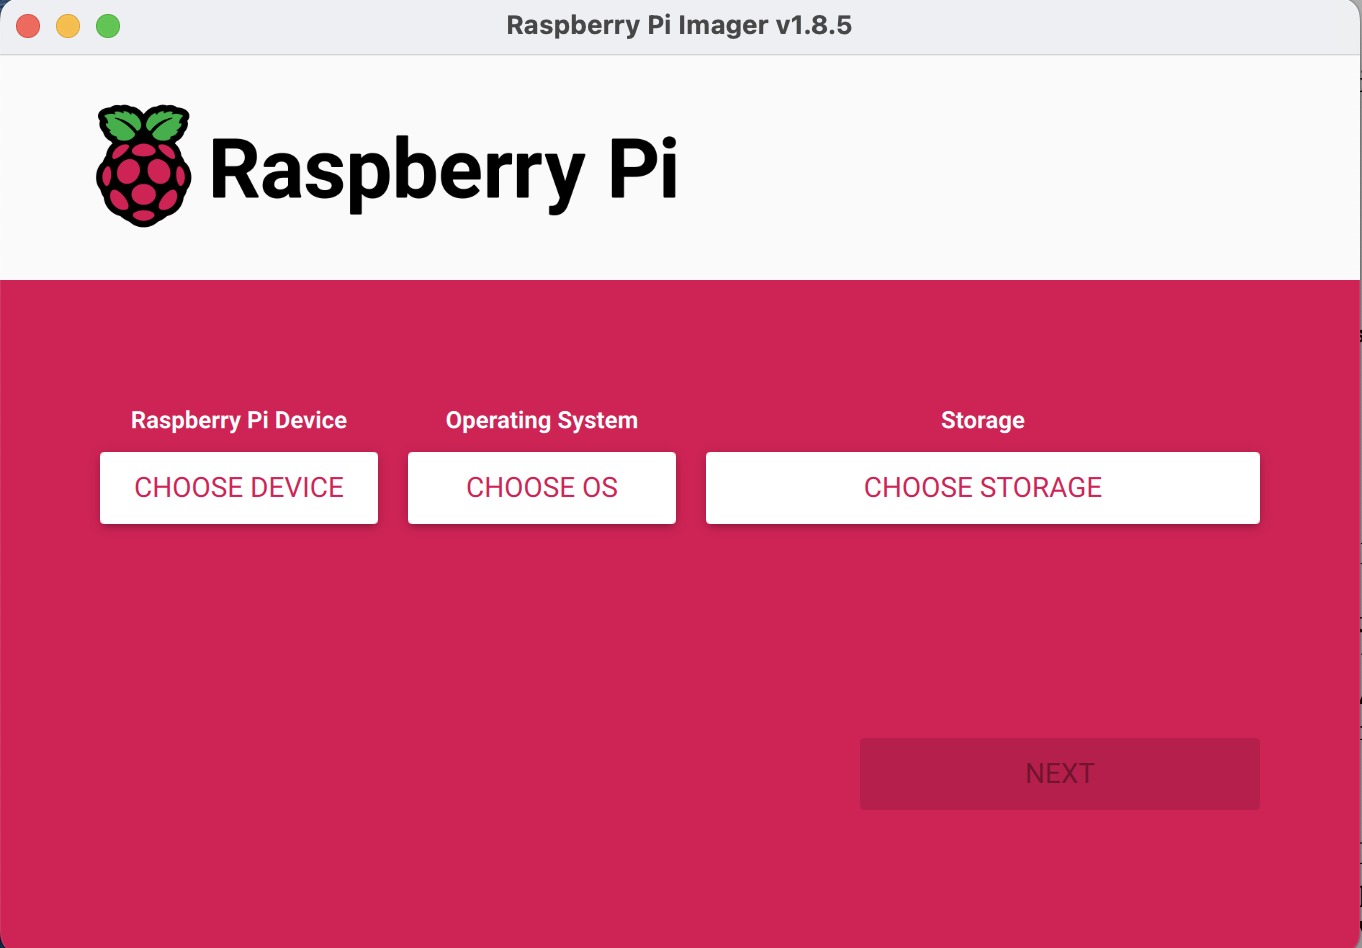
Once you have the installer, run it. It will bring up a window that looks like this:
Click on "CHOOSE OS" and select "Raspberry Pi OS (other)", then select "Raspberry Pi OS (64-bit)". This is compatible with the 3b+ that you will be using it will say that the releaseis 2023-05-03
Then click on "CHOOSE STORAGE" and select the microSD card, and click "WRITE". On the MAC it asks you for your system password, so you will have to know it. It takes awhile to write and verify (maybe 5-10 minutes, depending).
Note: if you are using Windows 11, and the microSD card already has something on it (like a previous Raspberry PI OS!), then Windows might not let you write to it. In that case, here is a prescription that works:
    o Plug your SD card into your Windows computer
    o Run the windows command app (Windows+R, type "cmd", hit return)
    o Type "diskpart" and press enter
    o Execute the following:

        list disk       (this will list the disks and tell you the disk number)
        select disk "x" (replace "x" with the appropriate disk number for your SD card)
        clean
        create partition primary
        format fx=exfat quick
When the program finishes, pop out the SD card and plug it into the RPI, and plug in the monitor, mouse, and keyboard (I used a wireless keyboard/mouse combo, so just plug in the USB dongle). Then plug in the power to the micro USB port on the RPI and it will boot up.
At UMD we will use the RPI on a WiFi network called 'umd-iot' that is for IOT devices. This network protects IOT devices from outside intrusions (you can get out to the internet from the device but nothing can get in). To use that umd-iot network you first have to register the RPI's MAC address with the helpdesk (I usually just email Aaron McQueen with the MAC address and he does the registering). Once they have the MAC address they can register it and send you the password to use the network. The catch here is that you need the MAC address to use the network, but you can't get the MAC address without booting it up and going to a terminal and typing:
ifconfigand reading it off of the wlan0 device. However, in the initial bootup process, the RPI asks you the username and password to create, the network to use, and then does an update. But you can't update without the network, and you can't use the network without the password, and you can't get the password without the MAC address. So you could bypass the network and run a terminal and get the MAC and send it in, but then I'm not sure how to do the update in the same way that the Raspberry PI linux OS does (there's probably a command, like apt-get, but who knows what the OS is really doing). So, the best thing is to get a RPI that already has an installation, boot it up with that SD card, read off the MAC address, then register it and get a password, then put in the new SD card and go through the setup below. So that's what I am doing.
So, pop in the SD card, power up the RPI, and then When it's up, it will say a few things about generating keys and reboot a few times. Then it will take you to a screen that says "Welcome to the Raspberry Pi Desktop". Click "Next".
It will ask a few things about setting country and language (I used USA and American English), and set the timezone appropriately. It takes around 30 seconds.
Then it will asks for a username and password. I used this:
username: rpi
password: physics495
Then hit next, and where it says "Set Up Screen" hit next again. Then it shows you a screen to "Select WiFi Network". Select "umd-iot" and give it the password. It might take a few seconds to connect with the network but you should be good to go. If you aren't at UMD using umd-iot and want to use something else, you'll have to play it by ear.
Then it takes you to a screen called "Update Software". Or if it doesn't, you should see an update icon in the upper right corner. Hit "next", and it will synchronize the clock (make sure it's set correctly, necessary for updating), then it will spend a lot of time comparing versions, downloading files, installing, and then it will restart. Might take some time.
Note: the rpi account doesn't have root privs, so you have to use sudo for lots of stuff. I did NOT configure it so that sudo needs a password. To do this see this web site.
Once you have the thing booted into the RPI desktop, the first thing to do is to slow down the mouse acceleration (use the preferences, upper left corner). Then, and this is my preference, I want to switch from the default BASH shell to the tcsh shell, which is what I'm used to (but it's up to you). To switch to tcsh you have to first install it and then us chsh:
sudo apt install tcsh
chsh -s /bin/tcsh
Once that is done, logout and log back in. Once you are back in, open up a terminal window and check via:
echo $SHELLIt should come back with
/bin/tcshMore custom setups to make things easy (for me anyway): setup .cshrc to add a few nice aliases and etc. So type
cd
nano .cshrc
and type the following into the nano editor window:
alias ll '/bin/ls -Fla'
alias up 'cd ..'
alias down 'ls -p | grep /'
set history = 1000
set prompt = "%c/> "
Then hit control-X, say yes, and save the file. Then to implement it:
source .cshrcand you will have these additions (and it will be automatic when you log in later).
Python is defaulted to version 3.9.2, and in the OS you are using, typing 'python' or 'python3' takes you to the same executable. To make sure you have the 3.9.2 version, do this:
python --versionIt should return
Python 3.9.2There is no need to update python (I left it at 3.9.2 even though it's a bit old). But for our purposes you will need to install this library by:
sudo pip3 install matplotlib
You should also install the plot library extension for making plots in popup windows:
sudo apt-get install python3-pil.imagetkand scipy, which has lots of good stuff like fourier transforms:
sudo python -m pip install scipy
When you try to install matplotlib, you might get an error that starts with this:
error: externally-managed-environment

× This environment is externally managed
To fix this issue the following command:
sudo rm /usr/lib/python3.11/EXTERNALLY-MANAGED
Note: "sudo" means "do this as superuser, or in other words, root". "rm" means
"remove", same as "delete". "/usr/lib/python3.11" is the directory of the file
you want to delete, and "EXTERNALLY-MANAGED" is the name of the file. That seems
to fix the problem, so try
sudo pip3 install matplotlibagain. Should work.
Serial connections to the RPI are done by using the right GPIO pins, and using the python 'serial' library. But first you have to tell the OS that you will be using the serial UART (that's the name of the serial protocol we will be using) and let it configure it. See
for details but for now, just follow the instructions below. Note that for the primary UART (which I think this is), the documentation says that TX is GPIO 14 which is pin 8 on the the GPIO header, and RX is GPIO 15 which is pin 10. So to enable, I did this:
sudo raspi-configThen click on "3 Interface Options", then "Serial Port", which might start with "I5" or it might start with "I6", apparently there are variations. After going into "Serial Port", then it asks if you want "Login shell enabled", say NO, but say YES to the next question about enabling the interface. Then exit and reboot (it asks you if you want to and say yes).
To check it worked:
sudo more /etc/group | grep gpioIt should return:
gpio:x:997:rpiwhere rpi is the username.
About the GPIO and 40 pin header: here's some good documentation: GPIO
You can also type
pinoutin a terminal and it shows you the pinouts.
Here is an image of the rpi 3 b GPIO pinout:
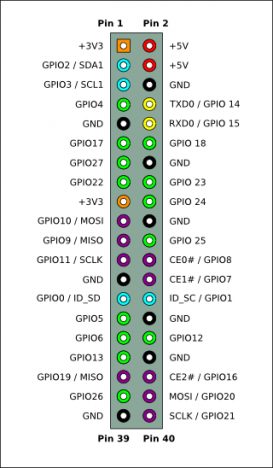
Pins are labeled 1-40, pin 1 is upper left in the photo. To hook up the UART, you need a ground at pin 6, then the TX at 8 and the RX at 10.
Pi-Apps is a nice interface to get some standard RPi applications. To install, go to pi-apps.io, or just use this one:
wget -qO- https://raw.githubusercontent.com/Botspot/pi-apps/master/install | bashand copy and paste the wget command in a terminal and run it. It then adds a "Pi-Apps" to the start menu under "Accessories". Run Pi-Apps and install the Puffin browser, it is way faster than the standard Chrominum that comes with the RPi installation.